Sciometa POS · How-to guide
QR Table Ordering
Put a QR code on every table so guests order from their own phone, and choose whether they pay online or settle at the till.
See juhend pole veel sinu keeles saadaval, seetõttu kuvatakse ingliskeelne versioon.
Make sure the store has tables
QR codes are generated per table, so the tables have to exist first. If the QR Codes tab says No tables found for this store, this is the step you are missing.
Tables come from your floor plan, not from the Table Order screens. Go to SettingsPOS and find Table Number:
- Switch Table Number on. This is what lets an order carry a table at all.
- Open the Table Setup row underneath it.
- Choose Table Map Editor → Open Editor, and lay out your tables.
Each table you place gets a number and a seat count, and those are what appear in the QR list.
Publish the QR codes
Open Self OrderTable OrderQR Codes. Every table in the store is listed with its Seats, its Token and a QR Preview.
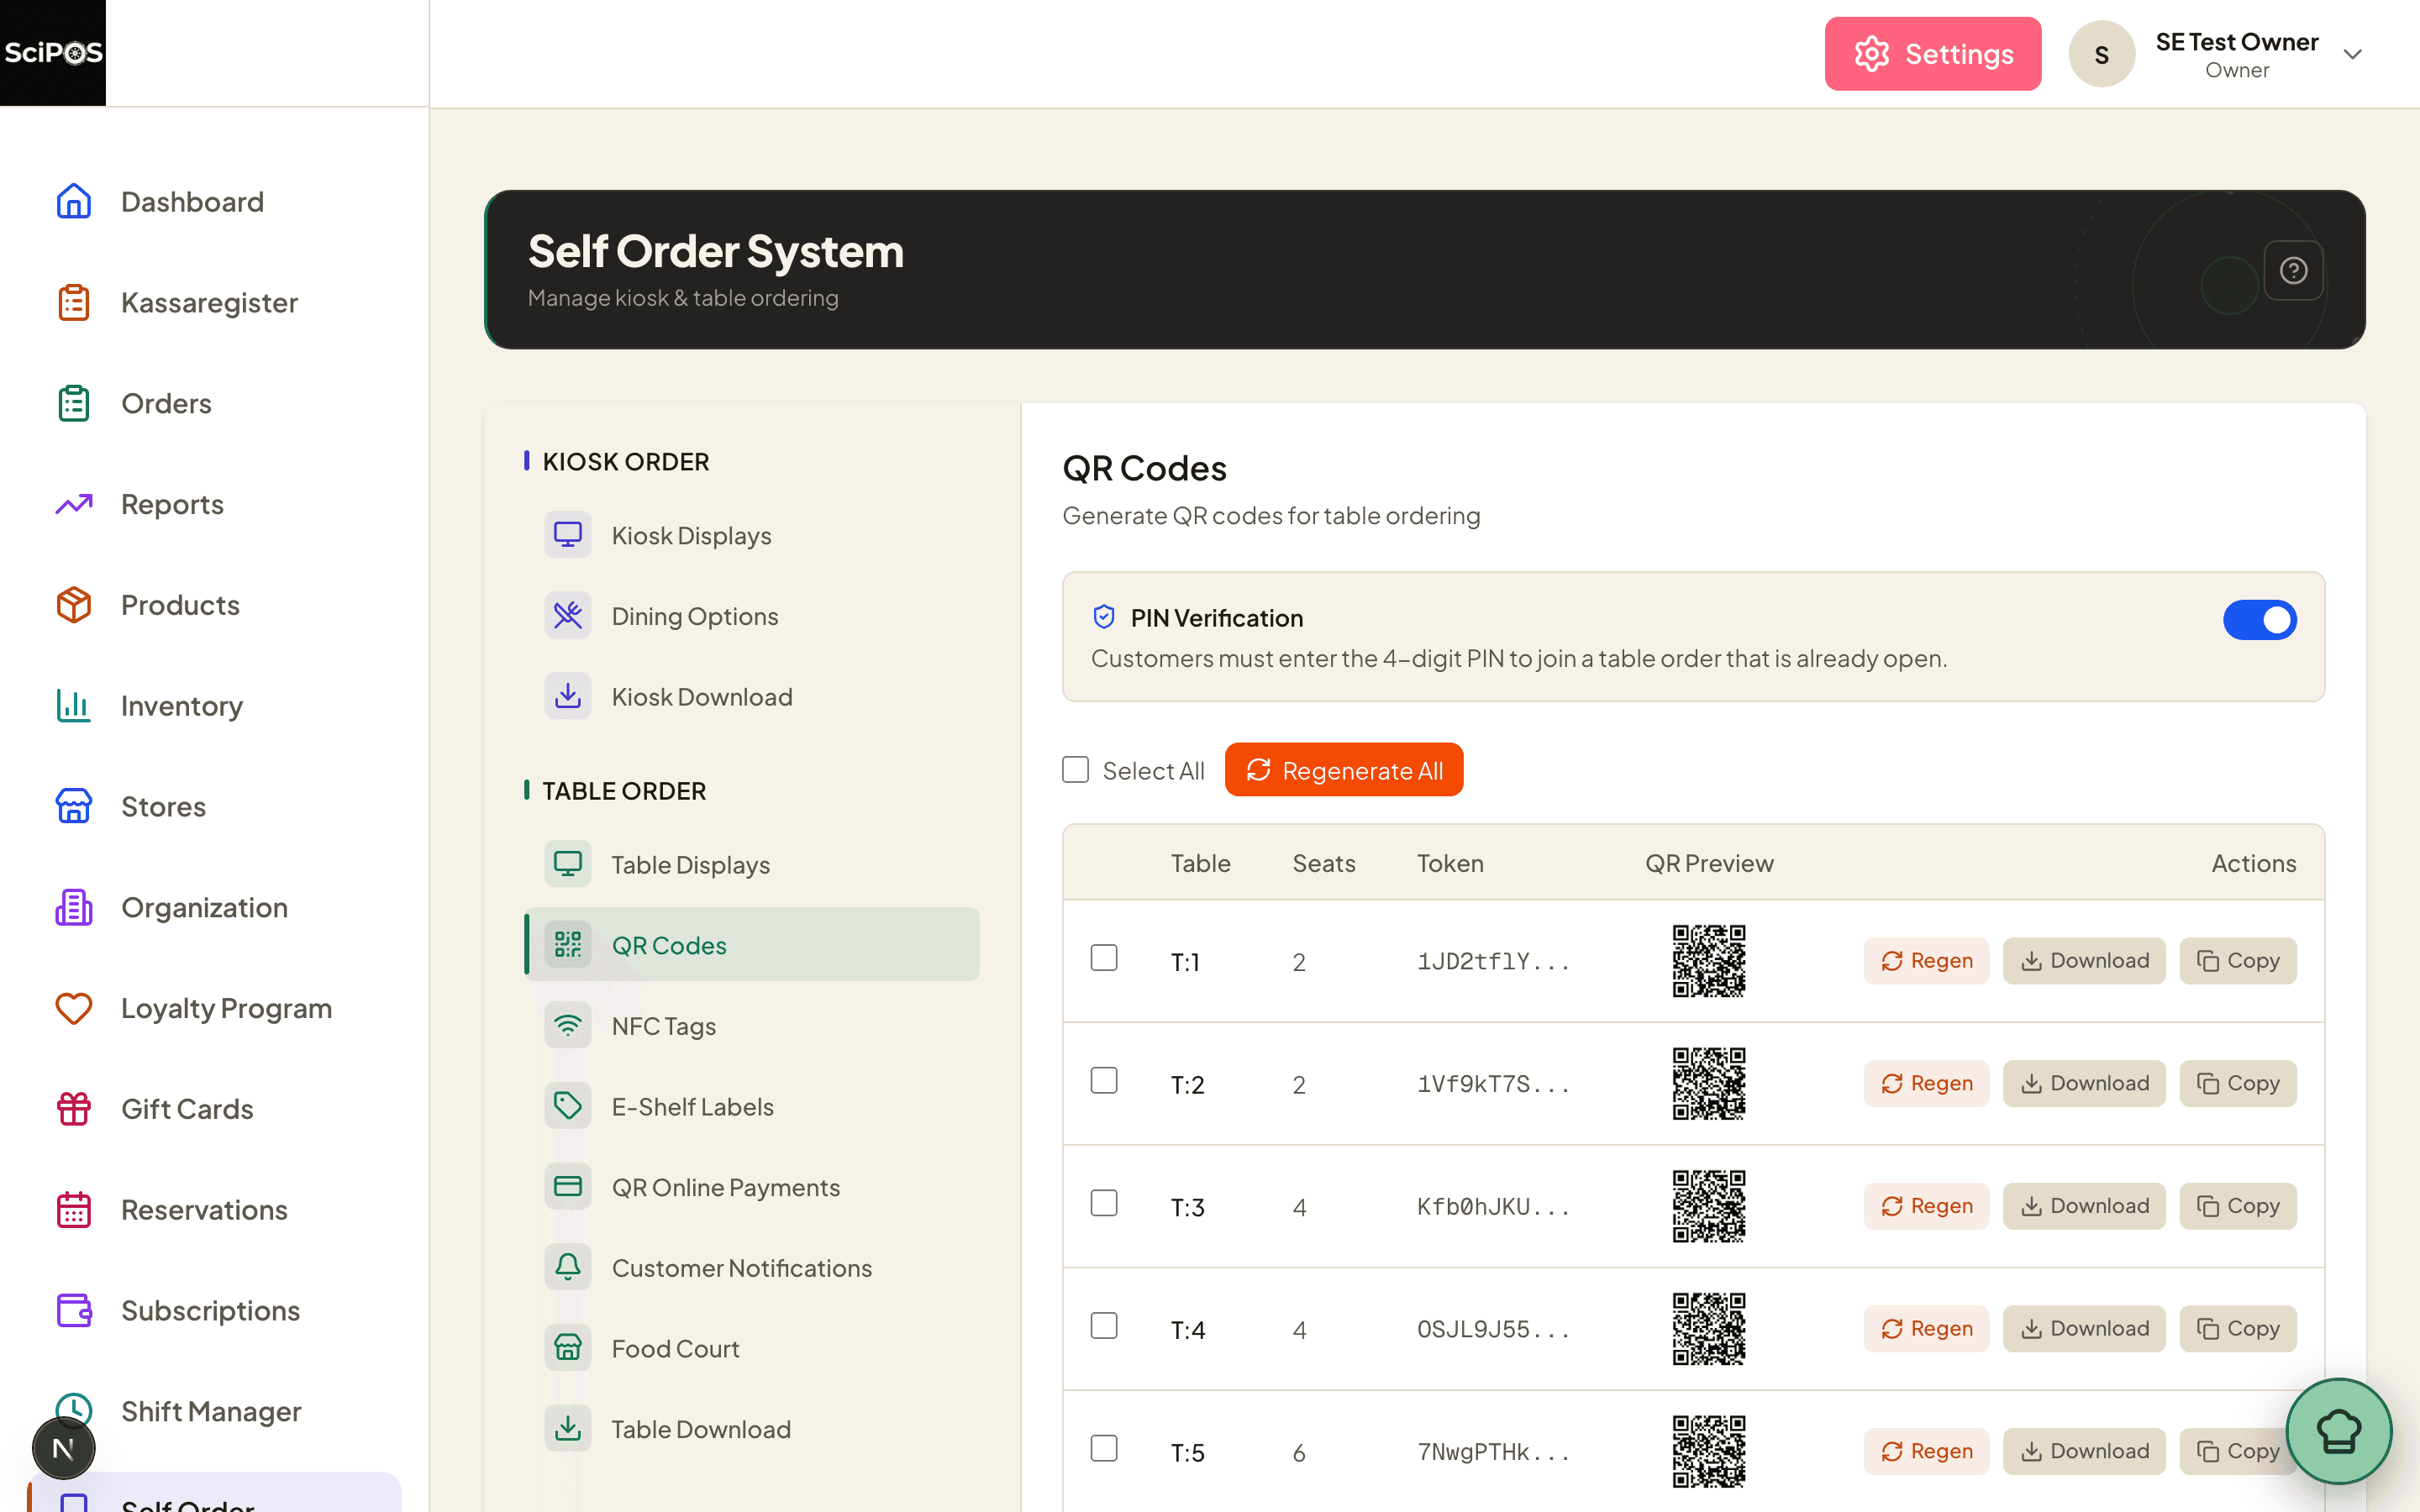
To get something you can put on a table:
- One table — Download on its row. You get a PNG of the QR with the table number and your store name printed under it.
- Every table — tick Select All, then Download Selected as ZIP. Files are named
qr-table-01.png,qr-table-02.pngand so on, so they stay in table order in a folder. - The plain link — Copy, for putting on a printed menu or a table talker you design yourself.
Decide when guests pay
Open Self OrderTable OrderQR Online Payments.
Online payment is off until you switch it on, and the timing choice stays locked until it is:
- Pick the store, then choose whether it follows Use Organization Defaults or Use Store-specific Settings for its payment provider.
- Switch on Enable Online Payment. Guests then see a Pay Online button.
- Under Payment Timing, choose:
| Choice | What guests do |
|---|---|
| Pay after dining | Order round after round, then settle once at the end. This is the default, and the normal restaurant shape. |
| Pay before ordering | Pay as part of placing each order. The cart button reads Pay Now, and nothing reaches the kitchen until payment clears. |
Set when ordering stops
Online ordering follows your opening hours, and a session that was opened earlier is re-checked when the guest submits — so a phone left on a table cannot keep ordering after you close.
Both fields are on the store, in DashboardStores → edit the store → Opening Hours:
- The hours themselves decide whether ordering is open at all.
- Kitchen closing time — minutes before closing — stops online orders early. Set 30 and the last order on a 22:00 night is 21:30. Leave it at 0 to take orders right up to closing.
Guests who arrive outside those windows get a plain closed screen that tells them when you next open — Opening today at 11:00, or Last orders were at 21:30. Reopening Tuesday at 11:00. They are never shown a menu they cannot order from.
The table PIN
A printed QR code can be photographed, and the link stays valid until you regenerate it. The PIN is what stops a stranger adding to a table's open bill.
It is on by default. The first guest to scan a table starts the session and is shown a 4-digit PIN to share with the rest of the table; anyone joining an already-open order has to enter it.

NFC coasters and e-shelf labels do not ask for a PIN, and do not need to: a tap is signed by the tag itself and an ESL code changes every session. Only a printed code can be copied.
Telling guests their order is ready
Self OrderTable OrderCustomer Notifications has two switches per store:
| Switch | What it does |
|---|---|
| Enable WhatsApp notifications | Messages the guest when the order is ready. They enter a phone number at checkout. |
| Enable Email notifications | The fallback for guests without WhatsApp. |
Either way the guest's own Orders tab tracks progress through Sent → Preparing → Served without needing contact details.
Ordering from the table
Worth walking once on your own phone before you print anything.
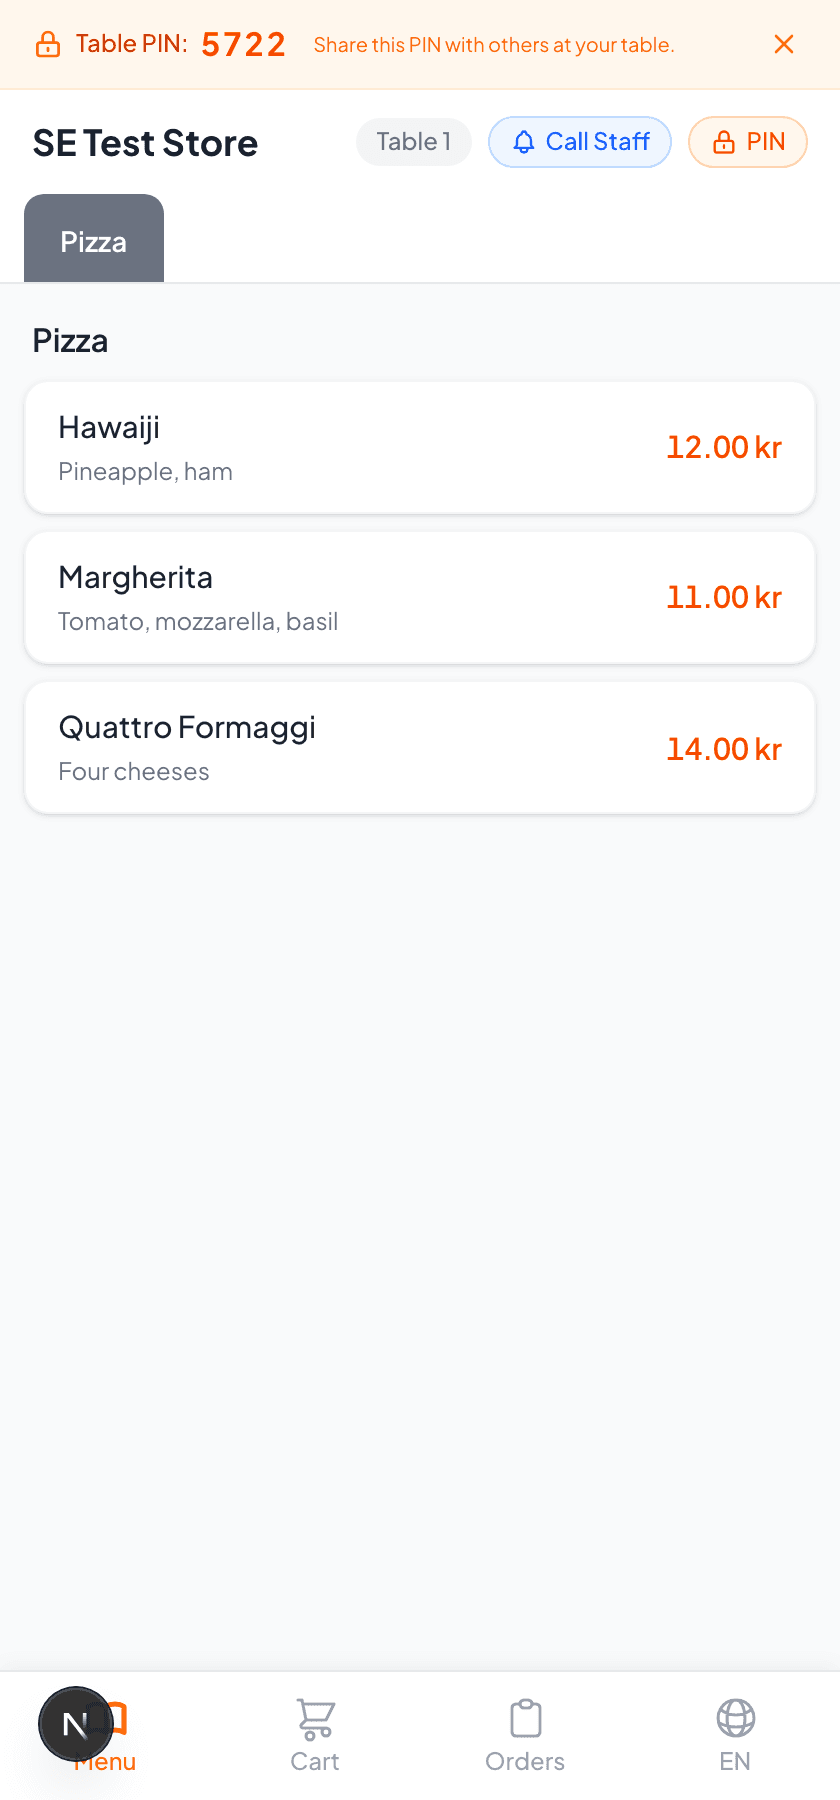
- Scan. The browser opens; there is nothing to install.
- Enter the PIN, if someone at the table already started an order.
- Give a name — optional, a nickname is fine. It is what separates one guest's items from another's on a shared table, and why the Orders list groups By name by default.
- Order. Tap a dish for its options and Add to Cart; dishes with no choices to make have a one-tap +.
- Place the order. Place Order sends it to the kitchen; the screen confirms with Order sent!
- Order again. Order More from the Orders tab adds a second round to the same bill rather than starting a new one.
- Finish. Checkout either hands them a Pay Online button or shows a code for your staff to settle at the till.
There is also a Call Staff button in the menu header, which goes quiet for a minute after it is used so one table cannot spam it.
The other Table Order tabs
The same group holds four things most restaurants never need to open:
| Tab | What it is for |
|---|---|
| Table Displays | A tablet app for tableside order notifications, with its own PIN and category filtering. Get it from Download App; it is separate from the guest's phone. |
| NFC Tags | Tap-to-order coasters. They are programmed by Sciometa — this tab only activates and deactivates them. |
| E-Shelf Labels | E-paper table labels that show a rotating code. Needs setting up by Sciometa first. |
| Food Court | For shared-venue QR codes. A food court invites your restaurant and the invitation appears here to accept. |
A first-time setup
| Step | Where | |
|---|---|---|
| ☐ | Switch on Table Number and lay out your tables. | Settings → POS |
| ☐ | Check your opening hours are entered, and set a last-order offset if the kitchen stops early. | Stores → edit store |
| ☐ | Open the QR Codes tab so every table gets a code. | Table Order → QR Codes |
| ☐ | Leave PIN Verification on. | Table Order → QR Codes |
| ☐ | Decide whether guests pay online, and when. | Table Order → QR Online Payments |
| ☐ | Hide anything that should not be orderable from a phone. | Menu Configuration → Categories, and Products |
| ☐ | Add the languages your guests actually read. | Menu Configuration → Languages |
| ☐ | Scan one code yourself and place a real order. | Your phone |
| ☐ | Download the ZIP, print, and fix the codes to the tables. | Table Order → QR Codes |
The scan test is the one that matters. It is the only check that covers the whole chain — subscription, table, code, hours, menu and payment — in the order a guest meets it.
Still not working?
| What you see | Most likely cause |
|---|---|
| The QR Codes tab says no tables were found | The store has no floor plan yet. Switch on Table Number in Settings → POS and lay out tables in the Table Map Editor. |
| The whole Table Order group is greyed out and says (Not subscribed) | Table ordering needs the Standard plan or higher, per store. Check the store, not just the organisation. |
| A guest scans and is told ordering is not available | That store is not subscribed to table ordering, or the code was regenerated after it was printed. |
| Guests are told the kitchen is closed while the restaurant is still open | Kitchen closing time is stopping orders early. It is minutes before closing, not a clock time — 30 means the last order is half an hour before you close. |
| Orders keep arriving after closing time | No opening hours are set for that store, so there is nothing for the gate to apply. Enter them on the store. |
| A dish the kitchen can make is missing from the phone | Its per-store Table flag is off in Products, or its category is switched off for Table — or the category is outside its weekly time window right now. |
| A sold-out dish still shows on the menu | That is intended: out of stock shows greyed out so guests can see you serve it. Switch the Table flag off to remove it completely. |
| Guests are asked for a phone number before they can order | WhatsApp or Email notifications are on for that store, which makes contact details mandatory at checkout. Switch them off if you serve the food to the table. |
| No Pay Online button appears at checkout | Enable Online Payment is off, or the payment provider is not finished connecting. Swedish stores settle pay-after sessions at the counter by law, so the button is hidden there by design. |
| Pay before ordering was set, but guests still order first and pay later | No usable payment provider, so the system fell back rather than showing a payment screen that cannot charge. Finish connecting the provider. |
| A guest cannot join a table someone else already started | They need the 4-digit PIN from the first guest. The PIN pill in the menu header reopens it. |
| Guests see only English | Only one language is configured, so no picker is offered. Add the others in Menu Configuration → Languages. |